About a month ago I wrapped up my time at Alientrap, working there for the last few years was fantastic. The work itself was awesome with variety and unique new challenges. The real standout moments came from how the studio was run with trust and generosity. I'm so thankful for the time I had there, and I'm hoping I can carry those ideas and values that I got to experience into all my future projects.
Doing the entire character art pipeline for an FPS one week, then level design for asymmetrical VR next week, and maybe some optimization experiments on an RPG later is such a fun way to work. I'll be uploading some of my work from Modbox and Gunhead over the next week or two, we made some pretty neat stuff!
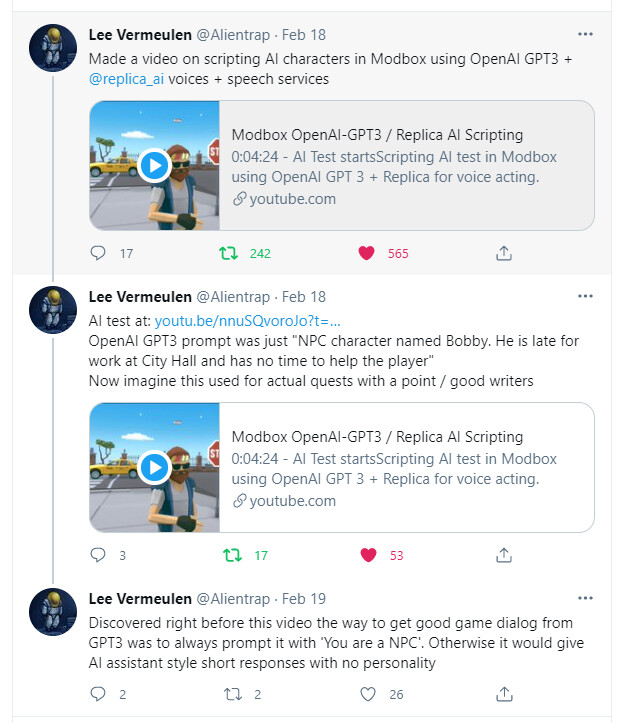
About a month or two ago, my boss at Alientrap showed us some awsome footage form one of his projects in Modbox he used GPT-3 powered AI to make trul;y interactive NPCs. It's super cool, and you cna see the full demo on his Youtube and Twitter here:
This is a pretty cool demo, and even cooler, I built the background environment! From design to playable AI sandbox, I got to create this world using some of the asset kits, a.k.a. Mods (it's called Modbox for a reason).
So that's our big development at work for a few months ago, my part here was pretty minor, but the overall accomplissement of my coworkers and the huge reception by the public is definitely worth noting! Also. maybe checkout Modbox , it's a really cool platform to build your game ideas for VR and for PC!
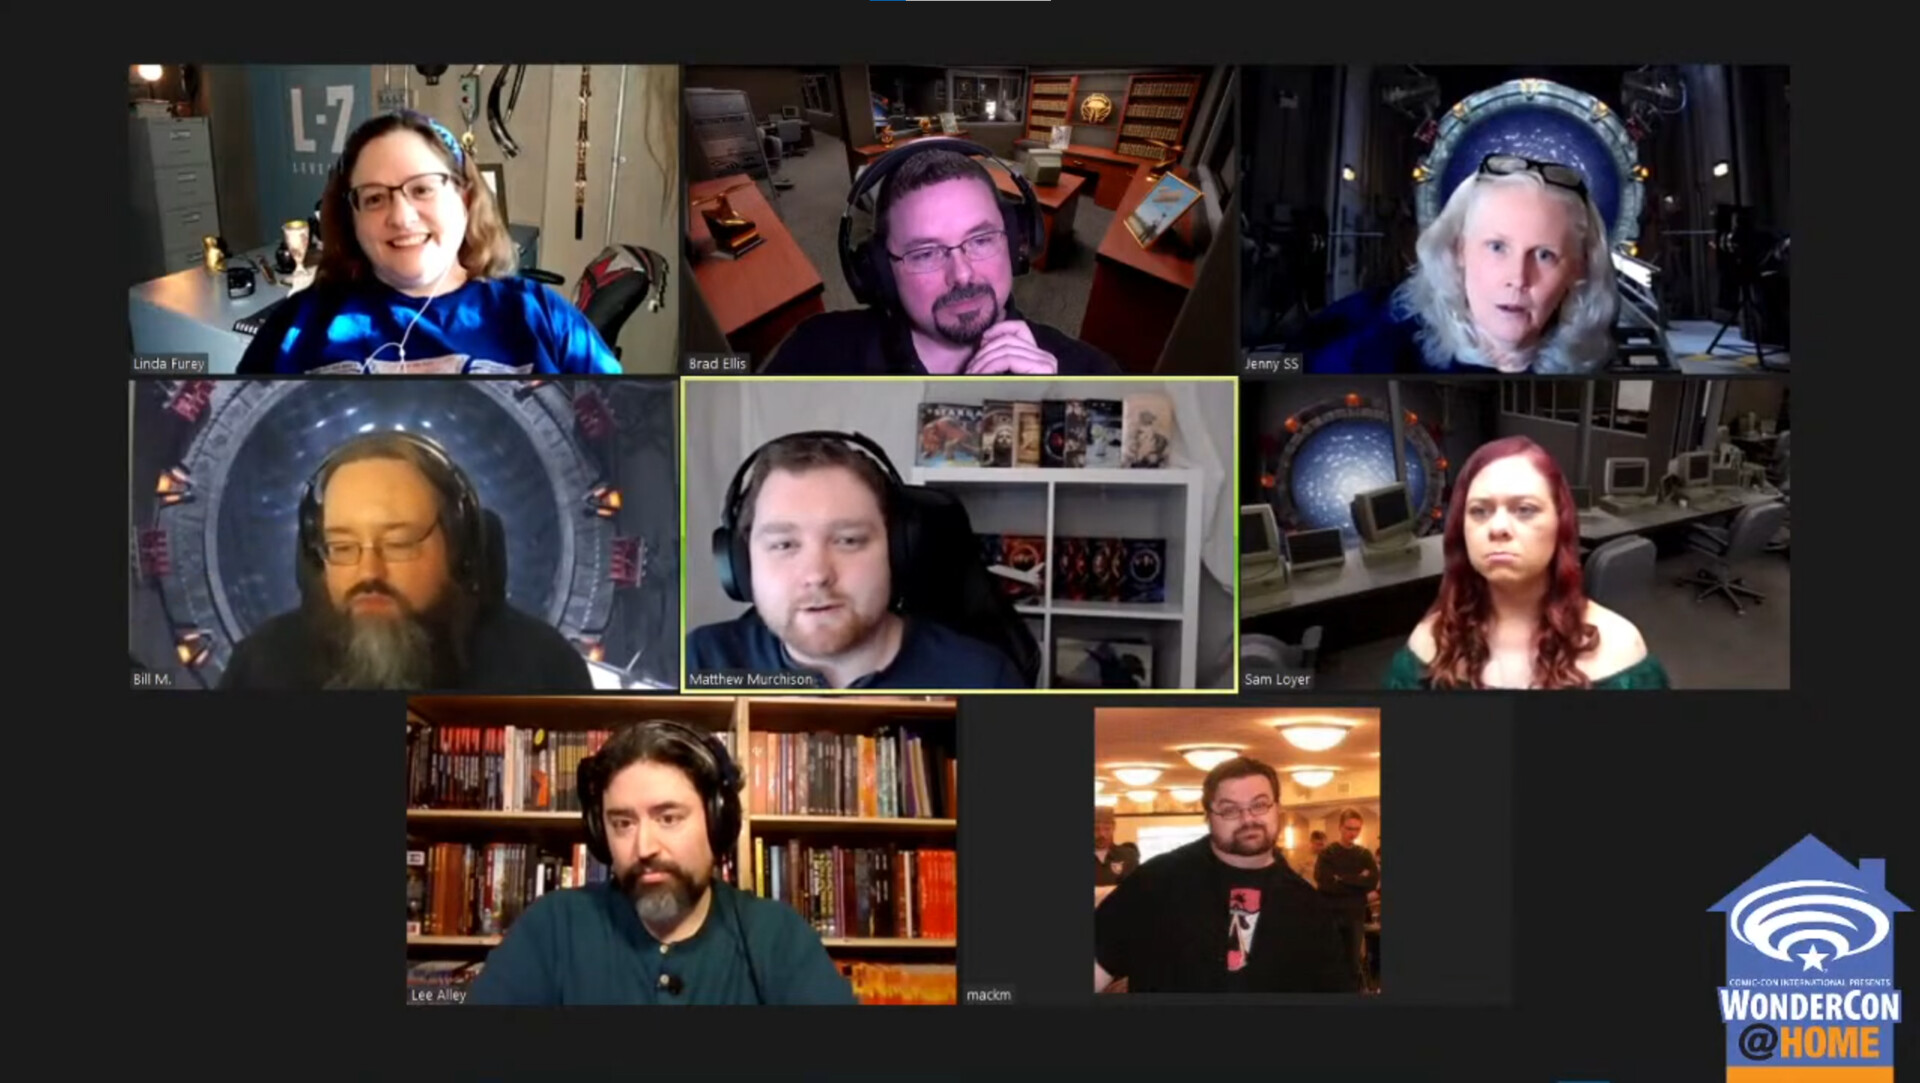
For the stream I was joining an awesome group of people who worked on the RPG, they all introduce themselves here: https://youtu.be/XYppChlbIvI?t=390
Linda Furey: Co-producer on dial the gate, and she wrote actual SG-1 episodes!
Brad Ellis: CEO at Wyvern
Jenny Simon: a 20 year Stargate production veteran who!
Bill M.: A Gate Master who has been running SGRPG games live with stargate cast members!
Sam Loyer: CCO at Wyvern
Lee Alley: An episode writer for the living campaign, and the show runner for the season 2 living campaign!
Mack M: The rule/game designer for the SGRPG!
This is a pretty awesome group to find yourself live Streaming with.
A bit about the model I was showing in the stream:
We started the tour outside, with these great security booths you can see in the rule book, in the stream I show-off the gates and doors opening a little bit.
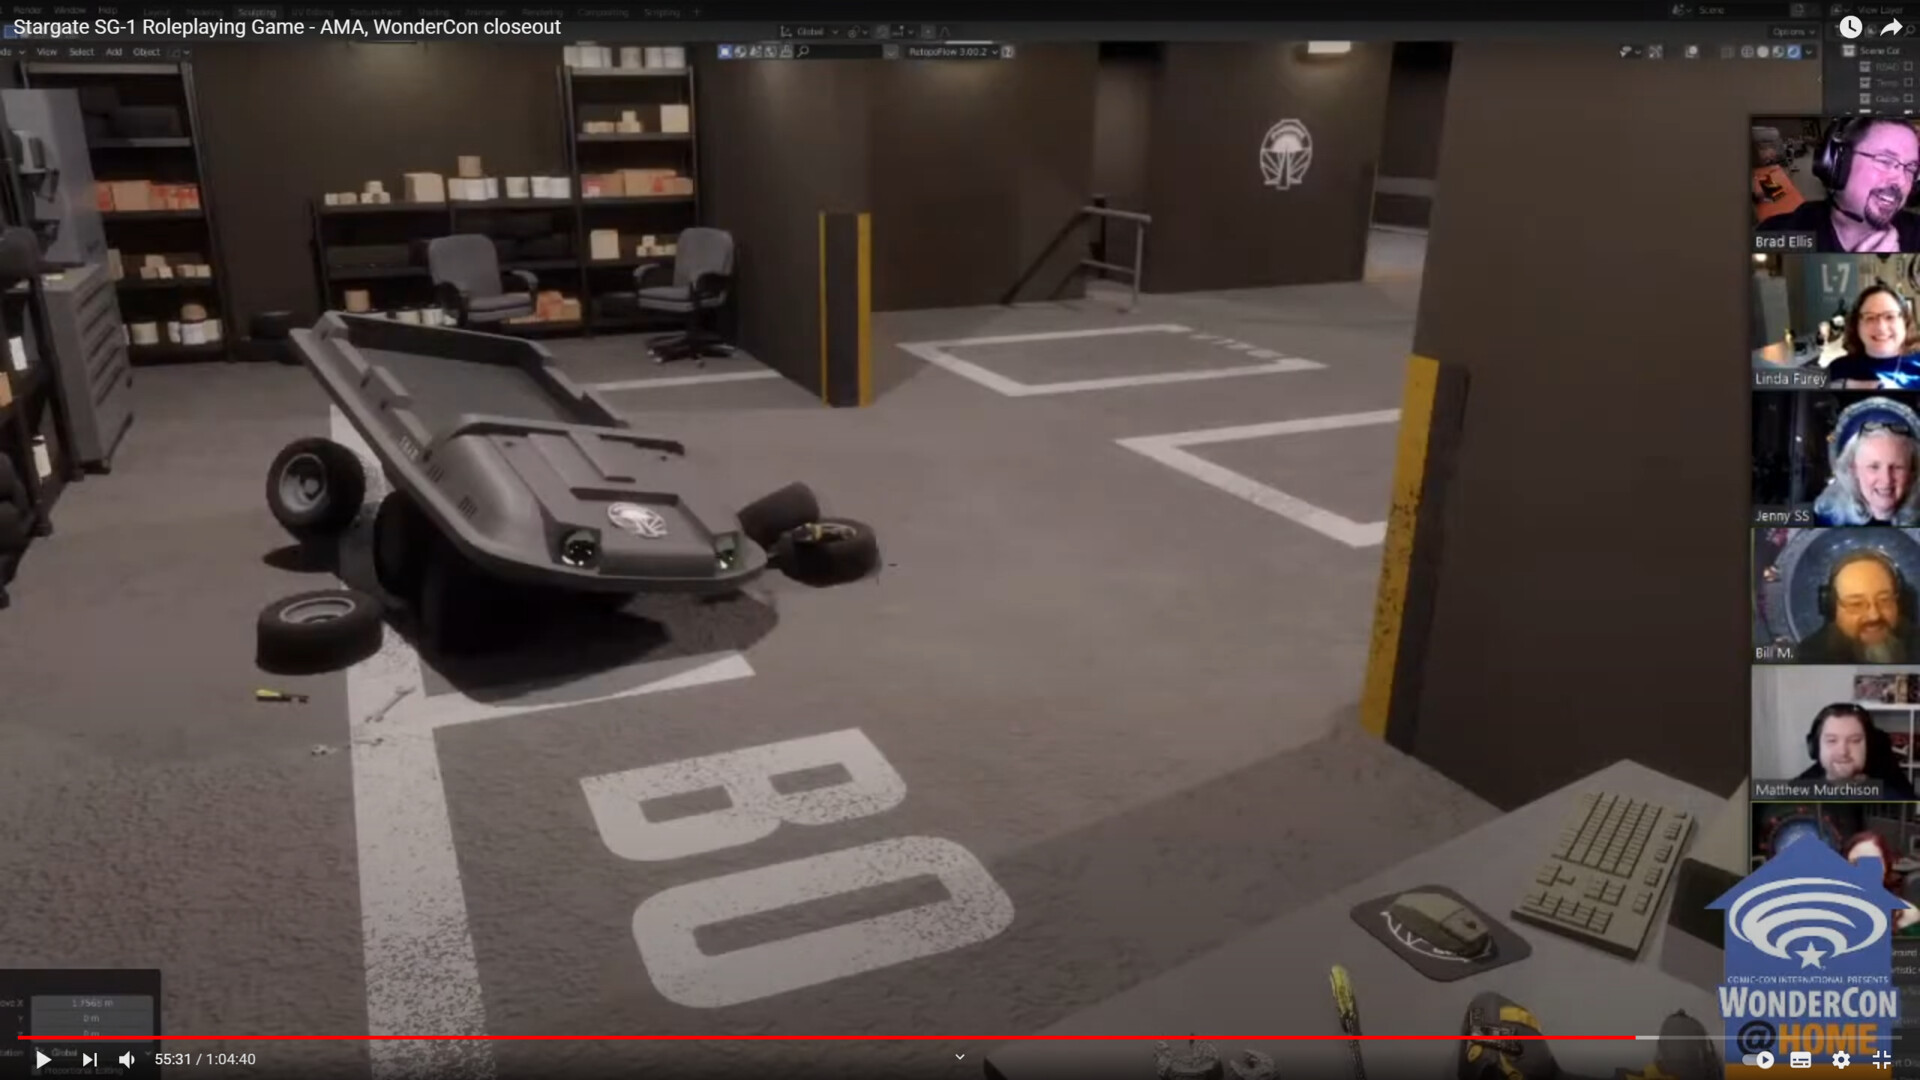
Inside they have a staging area with FRED and MALP parking, as well as a maintenance bay for all the véhicules on base!
The detail the the team at Wyvern has put into planning the base is amazing, it really feels like a functioning, plausible, off world base when you read the descriptions. I try to keep that feeling by adding as much realistic detail as I can, even if it's just a decal on the floor designating where a crash cart should be parked. Here is our inspection room, witch leads into a quarantine center (3 or 4 isolated cells, each with 2-4 bunks), and into the infirmary, which i tried to match as closely as possible with the SGC infirmary equipment.
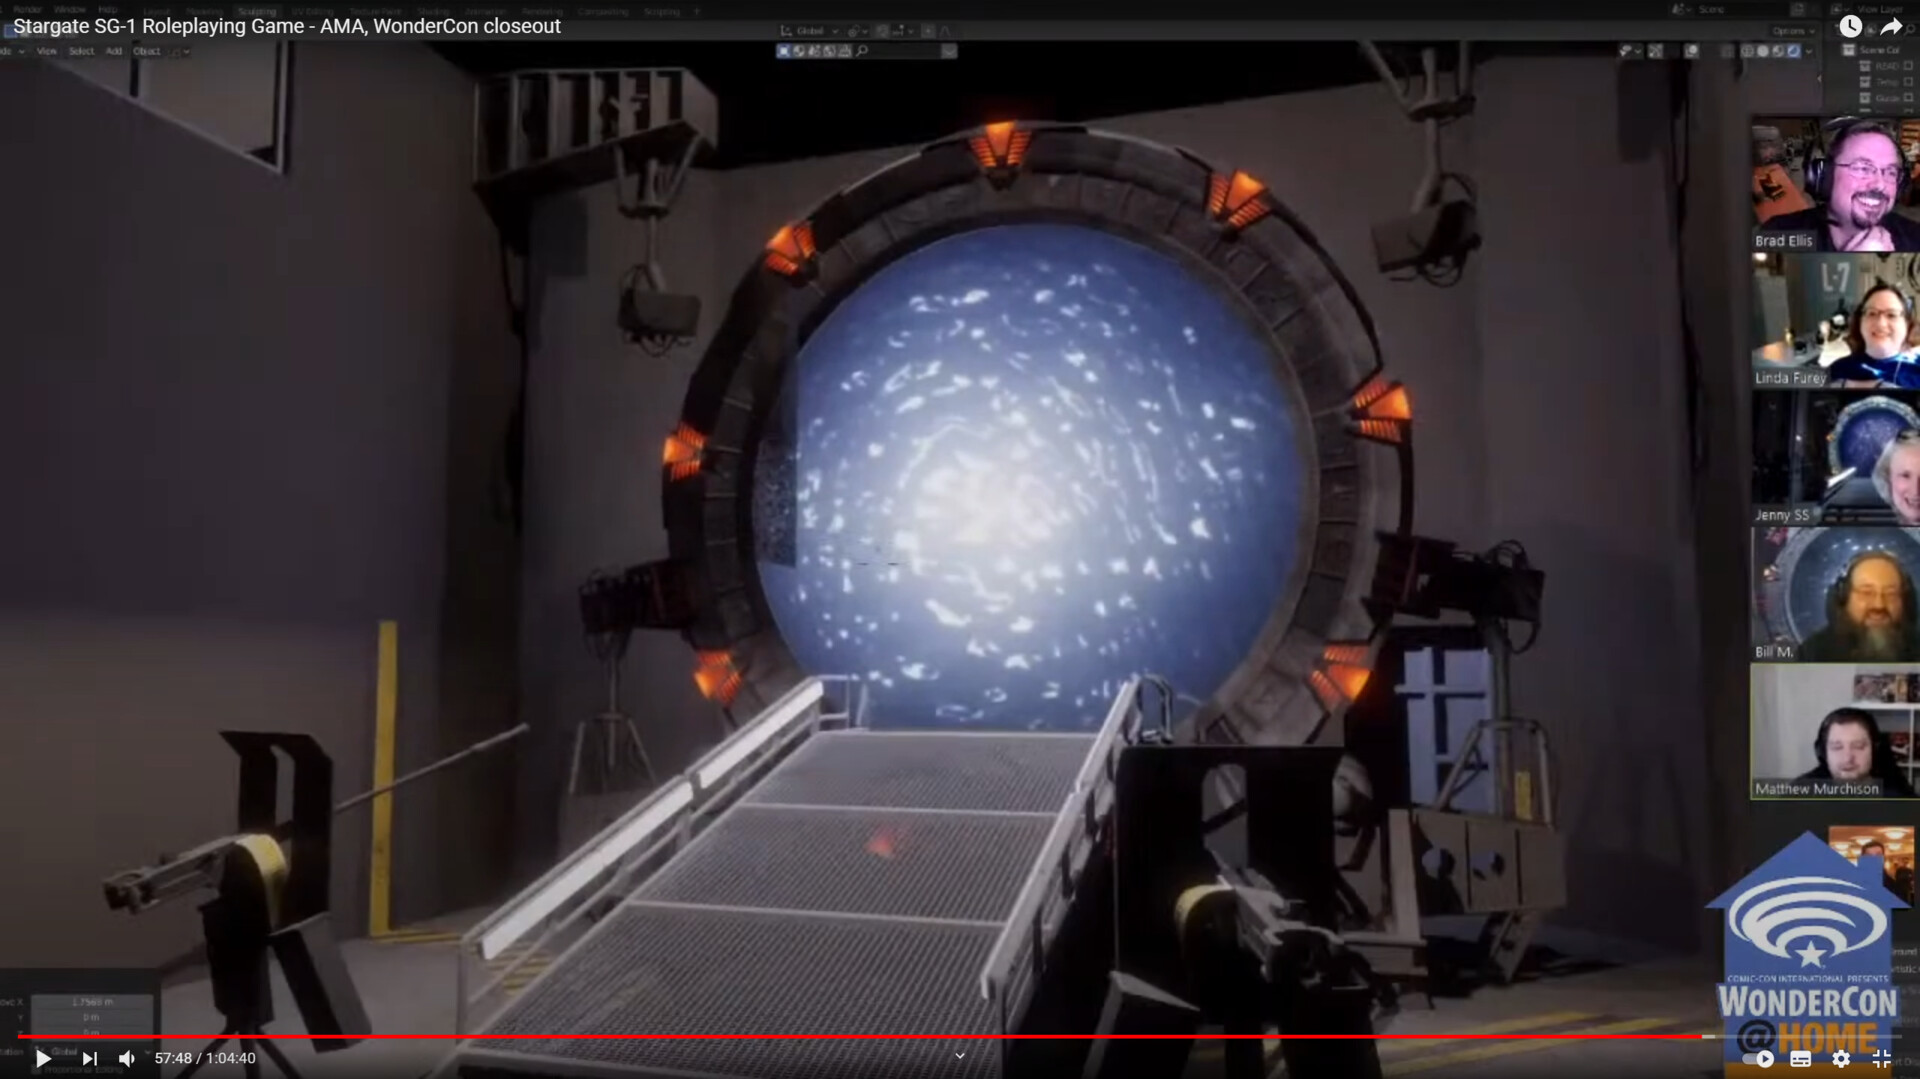
And of course, the gate room, You might notice that the ceilings and walls are a bit sparse. With the models being for top down maps, the floors having visual interest always comes first when I'm budgeting the time to work on these.
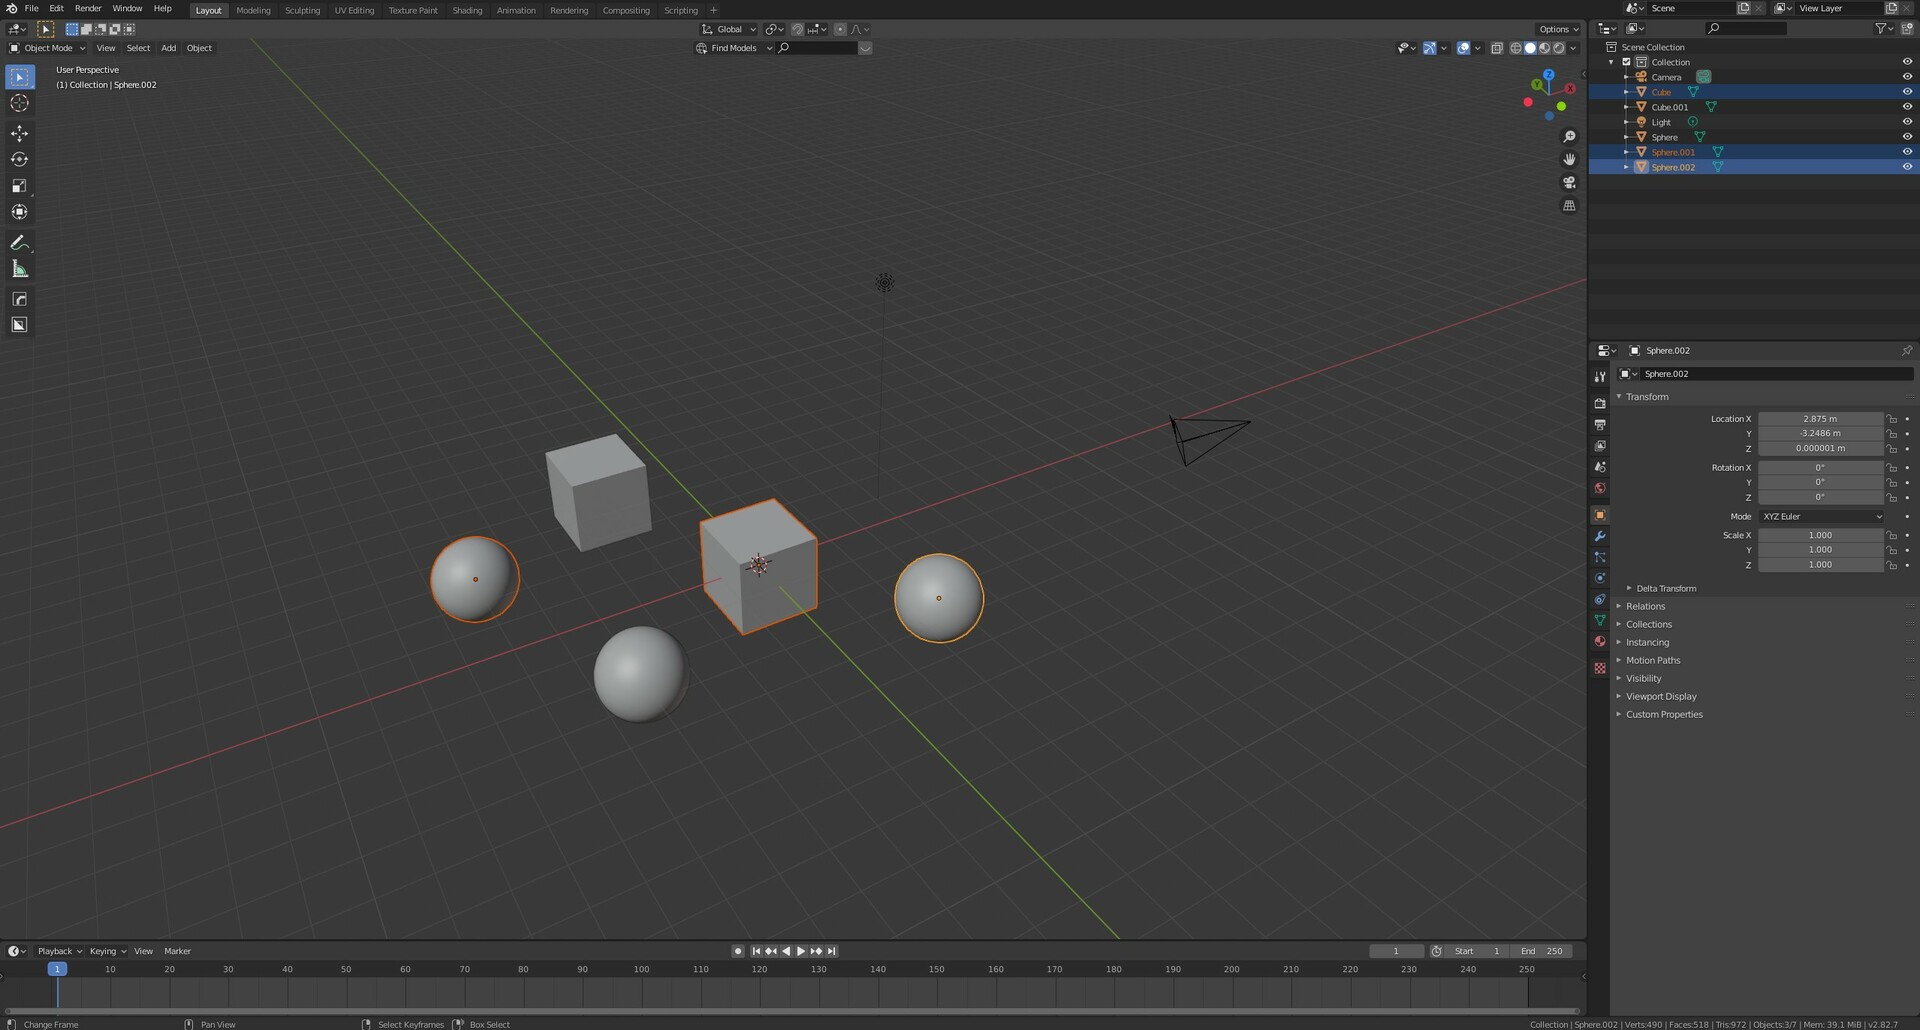
You can drag a Blender file into Unity and that will work perfectly, but it is bad practice (if something happens to that file you lose your model completely). Here is how to reliably have a good import without compromising your working files:
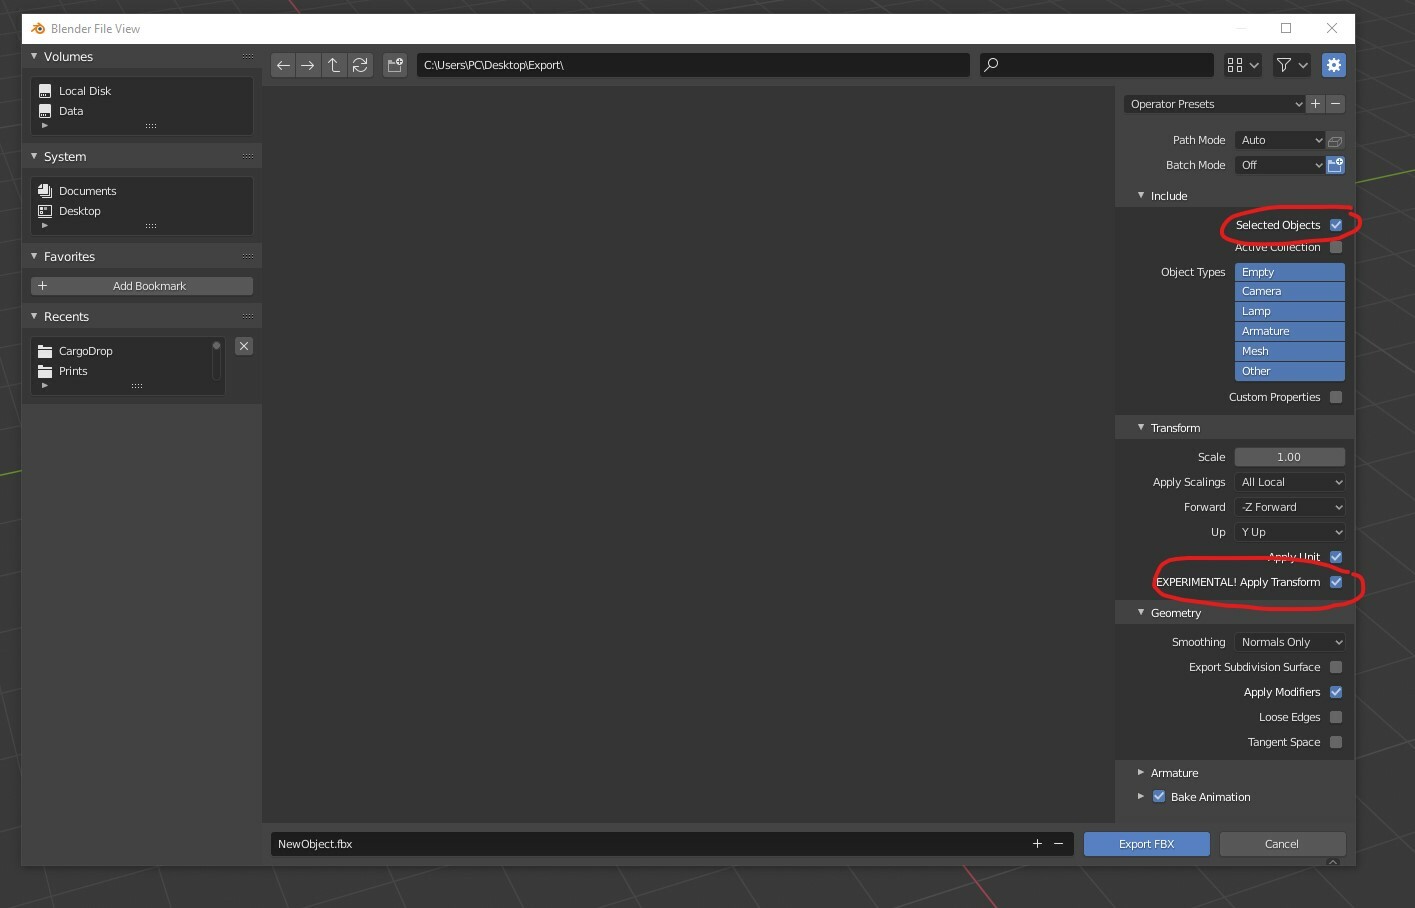
Instead, select all the meshes you want to export in Blender. Go to “File > export > FBX”. Name your FBX export, check the “selected object” and “Apply Transform” settings. Hit export, then drag that file into any unity project!
“Selected Objects” - only export the objects you have selected.
“Apply Transform” - makes your model play extra nice with unity’s coordinates
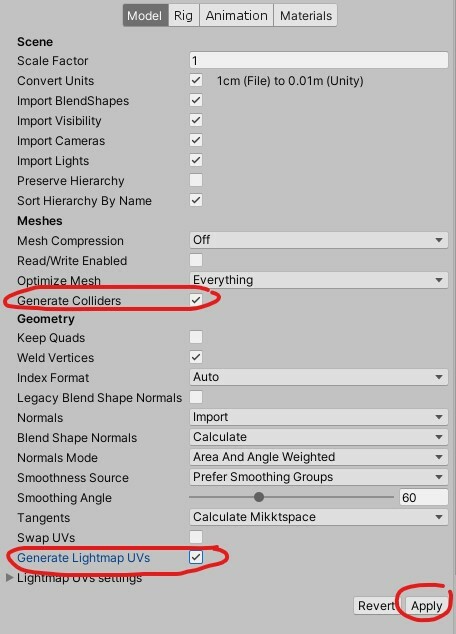
In Unity, you can select the model you imported and change the import settings.
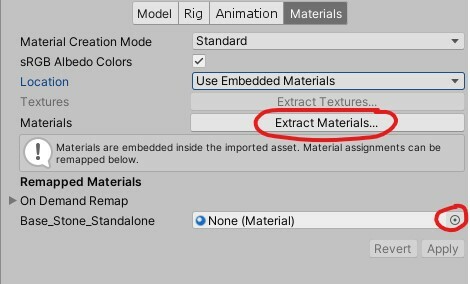
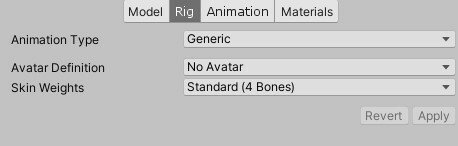
Check off “Generate Lightmap UVs” and “generate colliders” to get your models ready to be interacted with in-game! If you have materials on your model that you want to import, you can find settings for that in the materials panel of the import settings, same with rigging and animation options.
If your models are too big/small you can use the “Import Scale” valueto adjust the size they come in at! (One unity unit is 1 meter in the real world)
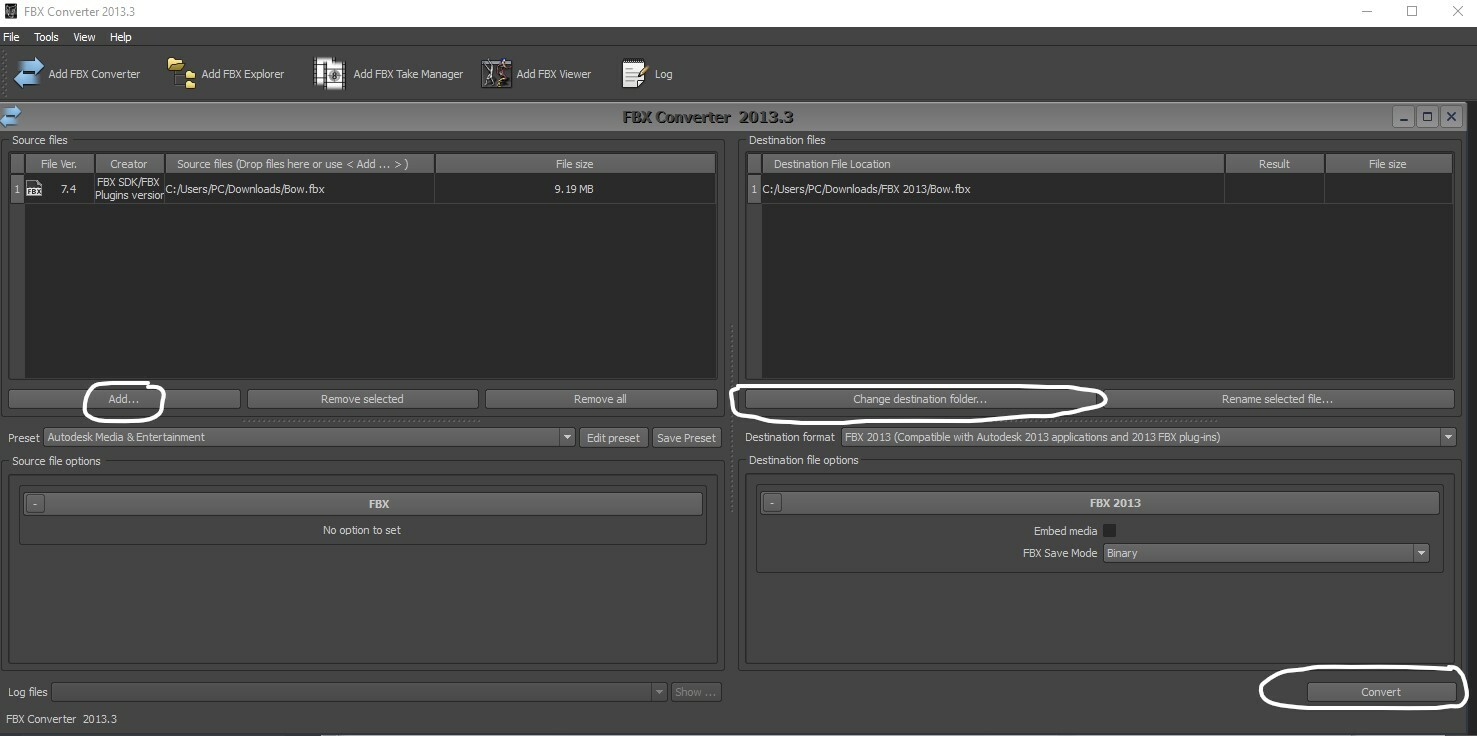
Select the "Destination Folder" for the new Binary FBX
Click "Convert"
FBX is fixed, import away!
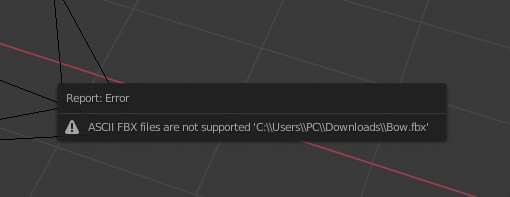
Why is this happening?
There is a 99% chance the artist that made the FBX used Maya and chose to format their files as .MA instead of .MB.
The difference is that MB (Maya Binary) is a more efficient file type, but MA (Maya ASCII) can actually be read and written by a human. This is huge if you ever corrupt a Maya file, because it gives you the option to manually fix the file.
Almost anyone that got taught Maya was probably told to always use .MA. Unfortunately most 3D artist do not know ASCII and don't have tools to fix ASCII for them. Add to that that using a Maya ASCII format taints everything you export from that file, limiting compatibility of your models.
I personalty always recommend using .MB files, you save storage, have a more efficient interaction with the file and you don't break compatibility with anyone who might want to use your FBX's one day.
Every once in a while you need a texture, sound, or model for a game or a prototype. It's easy to get something on google, but then the licensing isn't always right, and you might not have money to buy from an asset store. For me this is where CC0 and copyright free sites are the perfect solution.
Here is my personal list of the my favorite free asset sites around, from textures to sky boxes and more! I have no affiliation with these site, this is just my personal list of resources for when budgets and time get too tight, and I figure it would be more useful online than on my hard drive!
A spin-off of HDRI Haven, Texture Haven boasts the same high quality and all their assets are CC0 for use in any way! They have many resolutions for each texture set and everything is PBR ready.
Technical not free, they will give you 15 free credits to get some good textures! The library is mixed quality, sometimes really high end, sometimes just unprocessed photos, but they have the biggest library I have fount online. Definitely a go to site when I can't find what I need on Texture Haven.
This is my go-to site for lighting and backgrounds, the guy who shoots these is very dedicated and every single asset if free for use in any project. The images a extremely high quality, they come in a bunch of resolutions for rendering or games, and many come with back-plates to make sure your shots look perfect!
This is great library of game sound effects and music. Sound is really important in games, and this collection of SFX will go a long way in building immersion.
Icons8 has a massive collection of super polished free icons with a really nice consistent look. They would like you to credit them though (see Icons8 licenseing).
A tonne of professionally shot and processed 3D scans from museums around the world. No copyright at all! These models are super high res, and all look phenomenal. They have animals, classical architecture, sculptures, authentic armor and so much more ready to download!
Working on spirits has brought a lot of new technical challenges. Solutions have ranged from creating shaders to diving into C# and even a brief look at entity-component systems. But there are also smaller, more day to day challenges, like choosing the right workflow for your models.
There are 3 main workflows I am familiar with, each one is more efficient than the others at a certain distance – or with certain hardware -, than the last.
I would group them as such:
Close up/ Next-Gen graphics: Custom Normal workflow
Close-ish/Modern console or high-end mobile: Smooth shaded with high fidelity materials.
Far away/any system any time: ‘Normal’ modeling, hard edges are built into the mesh with physically separated faces. Lower poly is better poly.
These are some pretty simplified and slightly exaggerated examples, and in the last few weeks, I have used all of those on Spirits. Each of these styles has its place in modern game development, and sometimes even in the same model.
[Image: Star-citizen spacestation]
Low-Poly
If I wanted to, our camera setup and overall game would not be hurt going with the ultra low-poly setup and I have begun to use it for many backgrounds and ceiling models. It’s hard to beat the simplicity of a 1 face wall. The main reason I would avoid this workflow is to get nice bevel reflections on the edge of a hard surface. I chose to use this workflow because bricks don’t reflect that well anyways, and it gets much easier to work with non-beveled geometry. The time savings alone of not dealing with bevels, doubled up edges, modifier weights, or where the place a material transition or UV seam makes it the best choice for these assets that build the world up but don’t necessarily hold the spotlight.
[Image: Bevel vs hard edge]
Mid-Poly
This is sort of where the game industry is now, although more and more games are releasing with more advanced tricks up their sleeve. Mid poly is what most models are used to, making a low poly mesh that has a good silhouette, then making a high poly to bake a nice normal map from.
The workflow is simple and easy to break down into individual tasks. It’s also very universal familiar making it a safe bet on most teams. Tools like substance painter excel with this workflow! I used this kind of workflow on some of our facades and plants. This workflow gives nicer looking results but still has the easy user experience like the previous lower poly workflow. Unfortunately up close the model’s reliance on textures can break down showing lots of pixels. For Spirits (and for most 3rd person games) our camera never gets close enough to show the pixels in the texture, so we are relatively safe here.
[Image: Texture pixels]
Custom Normal Beveled
The highest poly workflow, made famous by games like star citizen, relies on some more advanced techniques to work. It essentially operates on the philosophy that modern games can afford to define normals through geometry, not just through textures.
Custom nor male really shine with any tillable texture. By leaving it to the mesh to add the edge details, a very cheap flat texture can be tiled many more times giving a much crisper look.
[Image: Starcitizenship]
[Image: Spidermanplaygorund]
I use this workflow on the back room kit. I chose this for two main reasons: The back rooms are not a priority like a mall, so if worst comes to worst I can fall back to a try-planar shader to texture them; The back rooms are also much tighter, meaning the camera is a lot closer to our edges,
[Image: Backroom kit]
And that is how I choose and use various modeling workflows in Spirits! I hope this had some useful information, and that you can go on and apply some of this reasoning to your own projects!
After talking with our art mentor, Jonathan, our team began looking into adding water to get some of the beautiful reflections back into our level. We have a few options, decal based puddles, or splat shaders with a height blend. Each of those give us our reflections, but they don’t add a sense of life to the scene. If we can have real time interaction between objects, players and the water, then we can also use the water to sell the time freeze effect!
This is a technique I have wanted to work out for a long time, but I was always missing a sage or two. With a pointer by our tech mentor Andrew I found this tutorial:
He uses a lot of shader code, but If we take that technique and apply it to Unity’s Scriptable Render Pipeline with Shadergraph we can do the entire thing code free.
Step 1: Basic Setup
All we need in the scene are one Particle System (Visual Effects Graph now), Orthographic Camera, Our water and Ground planes, and our Player Object.
A plane for the Water, a plane for the ground, and an orthographic camera.A plane for the Water, a plane for the ground, and an orthographic camera.
We’ll create a Render Texture, a Material and a PBR Graph.
Assets we create for the water system.
I also created a water ripple texture, you can make them easily in Photoshop/Gimp, here is the one I used for my first attempt.
A particle for water ripples. It is partly transparent and white, so may be hard to see.
Step 2: Shader Setup
The shader is really simple, we can use ShaderGraph to make our water without any code!
The Shadergraph for water interaction.
This node graph has three major parts:
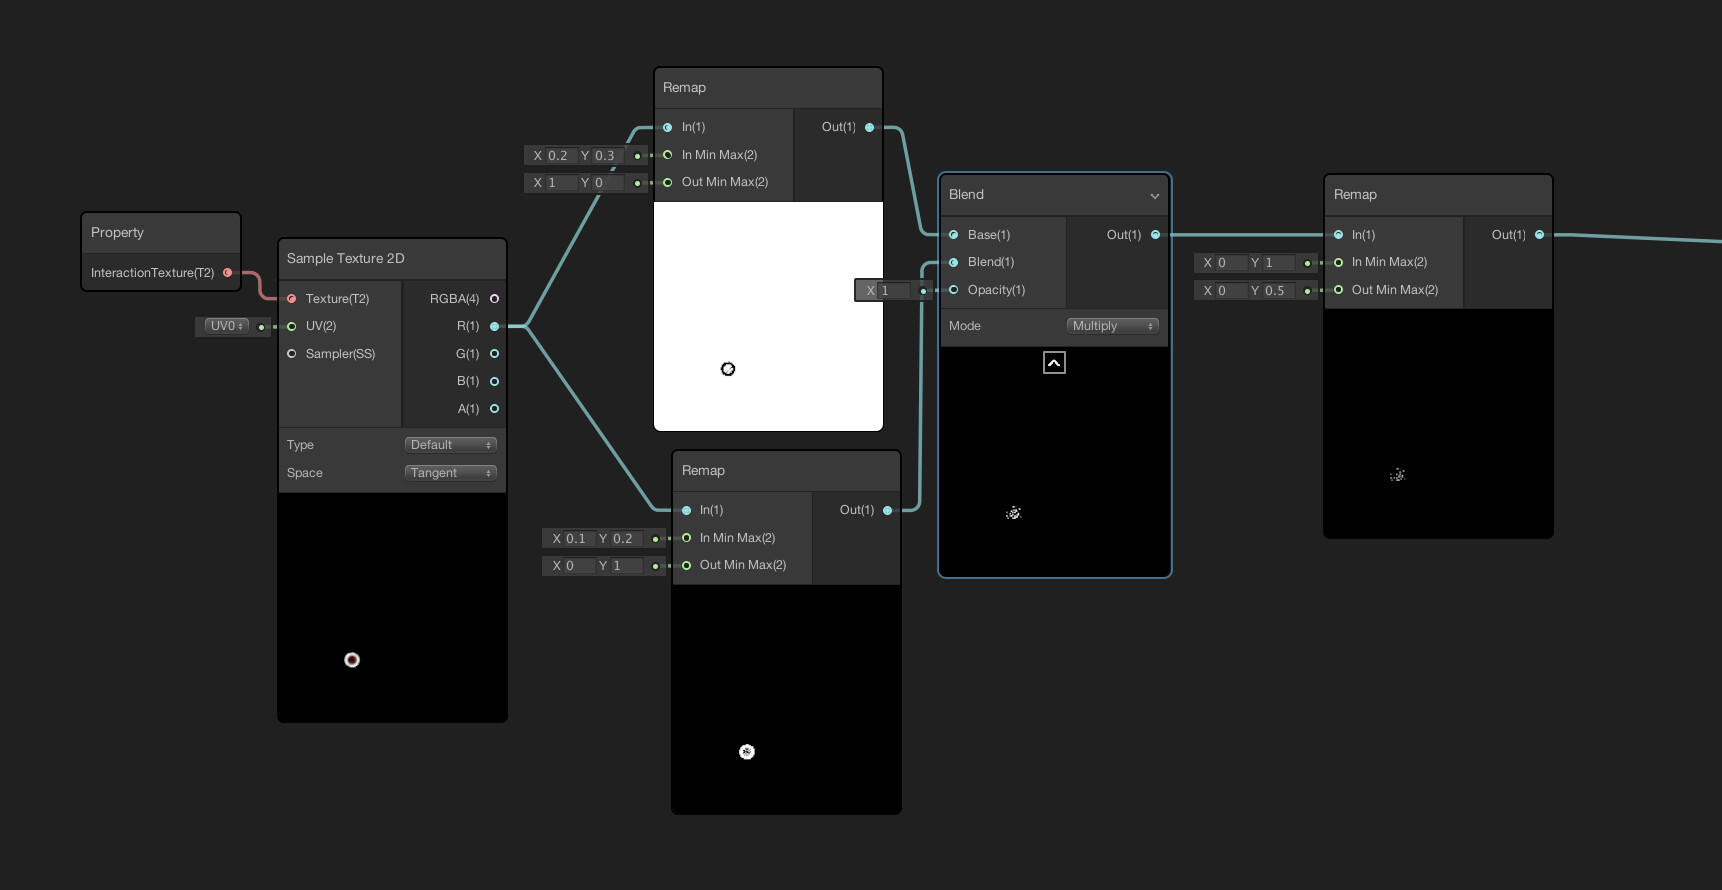
The fist part is to get the water interaction in, we’ll do this by sampling our render texture. Our render texture can be treated like any other texture:
The nodes to bring in our interaction texture.
The first node is just a texture node but turned into a Property. You can find those over in the blackboard:
The blackboard with all of our shader parameters.
With the sample 2D node we want to take only the red channel. This lets us use the other 3 channels (G, B, & A) for other types of interaction (footsteps, tire imprints, craters/impact marks).
The next few nodes are some math to make our water particle more interesting, it is not essential to the shader, I remade the simple gradient for opposite and exaggerated black and white maps. Then by multiplying them we get a more detailed ripple.
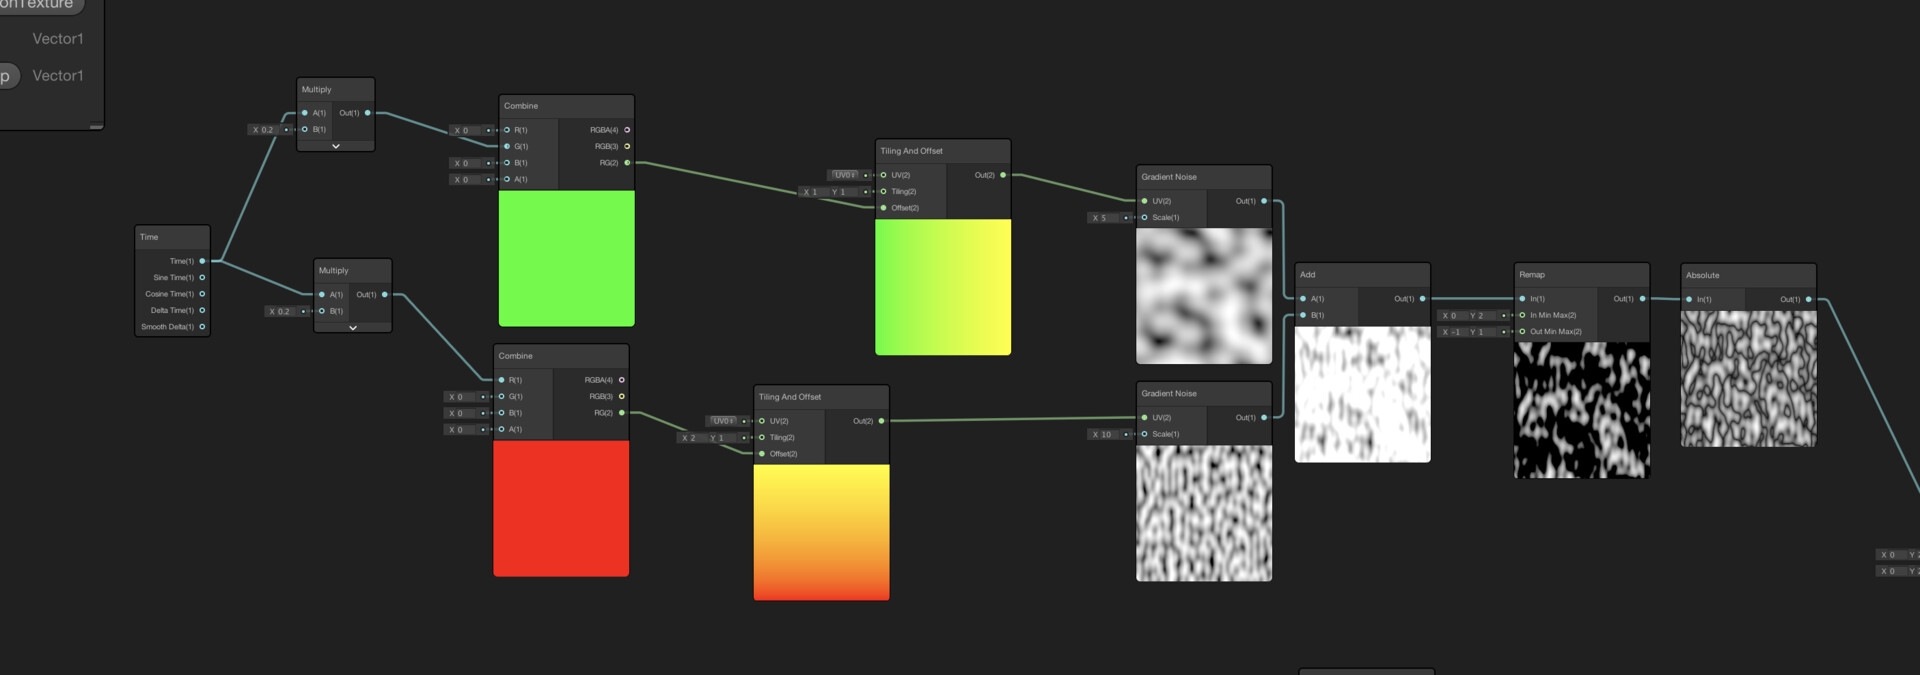
The other node group deals with some simple waves:
The nodes to make up some procedural waves.
Game water is often just a water texture scrolling in two directions, for our shader I used two noise textures but you can substitute water textures, a properly flow-mapped water texture or any other method you prefer. The tilling and time nodes are what make the scrolling effect work.
The final set of nodes merges our interaction with our waves as a height map (Black and White) and generates a base colour, and most importantly a normal map. The normal map will let us see the interaction through the reflections on the waters surface!
The node group to get our waves and interaction to mix.
We bring in the interaction texture and add it to the wave texture, then we split it into colour and normal. The colour just lightens our black and white map with a light blue for our water tint, It will be barley noticeable, but it will highlight the waves a bit.
The important part is the ‘Normal form Height’ node. It will take our height map and generate a normal map, essentially converting our elevation (white is high, black is low) to angles (blue is up, red is right/left, green is up/down in the image space). This the works with unity to create nice smooth reflections on the water.
The last two Properties let you control the transparency of the water int he editor! Each one is a Vector 1.
Now we have a functioning water shader, but we need data to interact with.
Step 3: Building the interaction elements
The interaction elements are very simple, you need a particle system and a layer for that system! Then with some camera adjustments we are good to go!
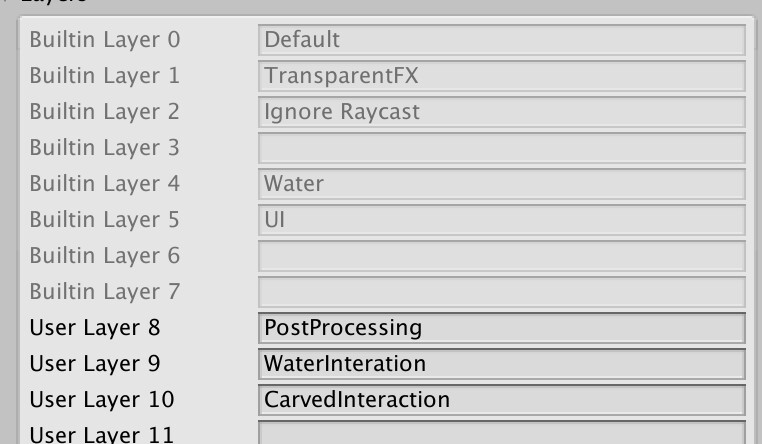
First well add our interaction layer:
The layers dialogue, with our water layer added.
With our WaterInteraction layer added we can create a particle system parented to the player/interacting object.
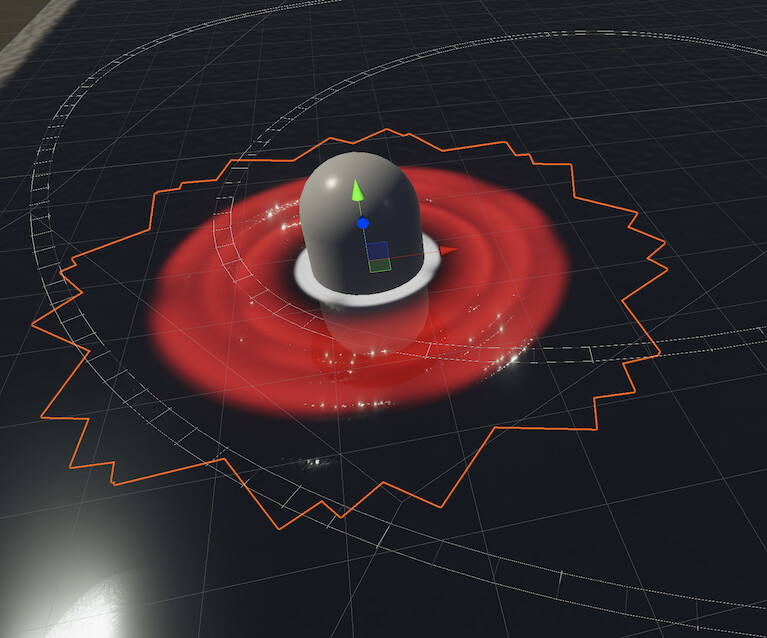
The ripple particle system in the viewport.
When we create our water particle system we need to make sure it is on the WaterInteraction layer, so that we can use a mask on our cameras to make sure it only shows up in our RenderTexture.
Our interaction particles need to be in the WaterInteraction layer.
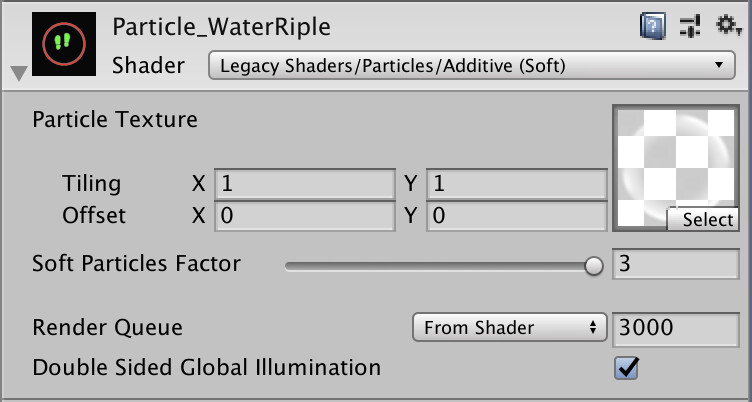
Here are the settings for the particle material, we will be using the legacy/Particles/Additive shader that comes with unity. Most shaders are not compatible between default unity and the new Scriptable Render Pipelines, luckily some unlit shaders still work, and the Additive Particle Shader works really well with our particle system controls for tint and opacity.
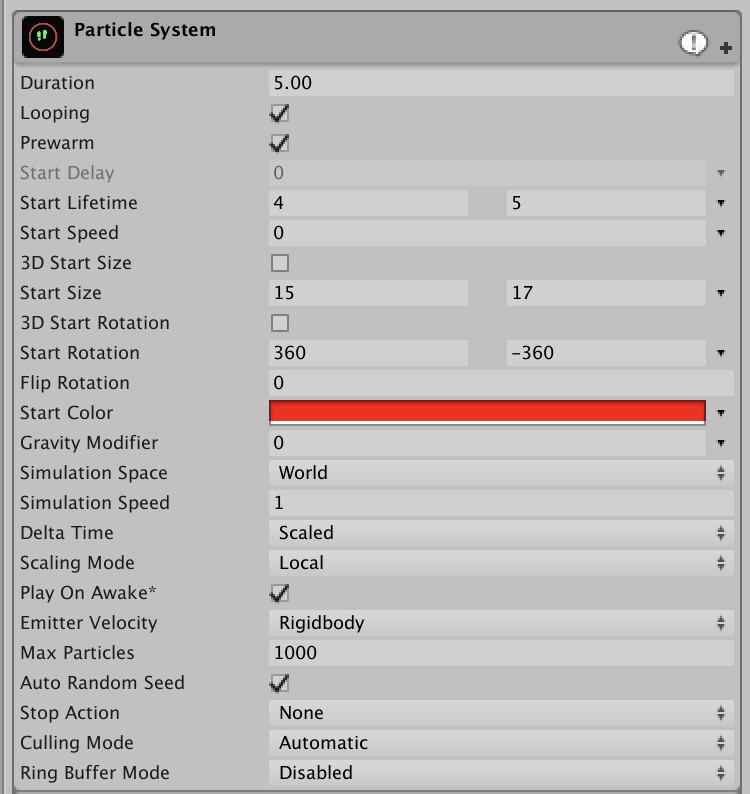
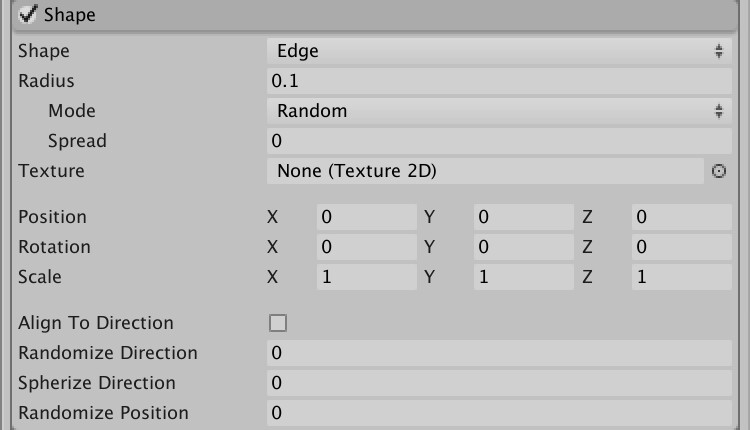
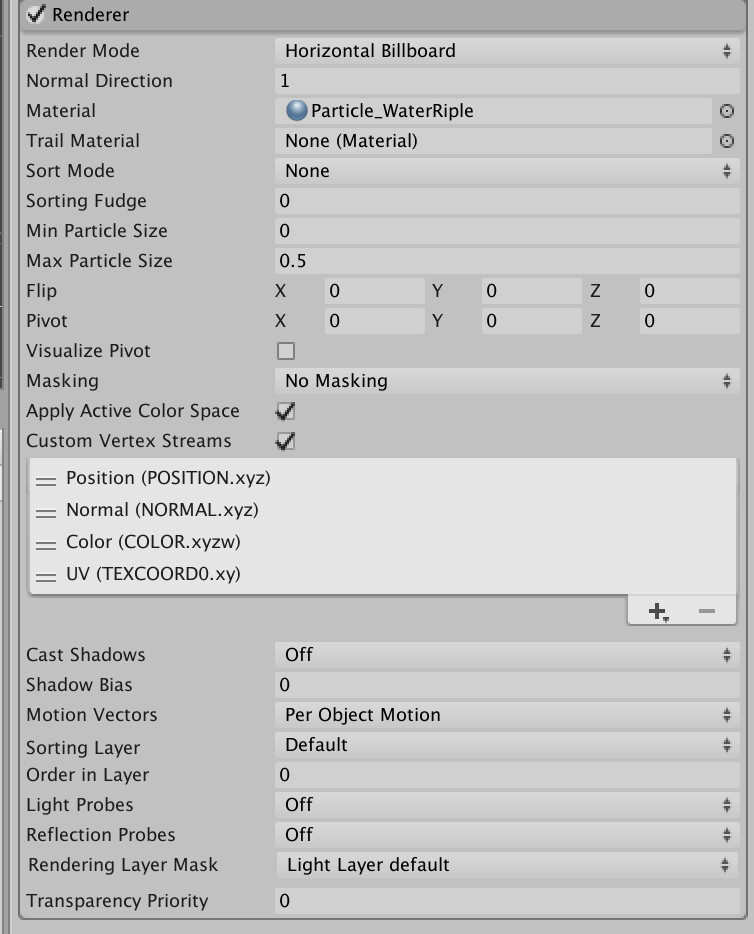
The first settings for our particle, the red colour lets us isolate water interaction to the red channel in our Render Texture.The emission settings will make sure that there is always interaction around the player, and that there are enough particles when they move.By having the smallest possible emission area we can control the particles more accurately.Over time we want our particles to fade out, a feature uniquer to the additive shader in HDRP. This will clean up any jarring transitions from our ripples to the waves.Using the size curve we can control how the ripples spread out.Adding some rotation to the particles can give us a more realistic and random result without needing multiple textures or flip books.In the renderer we want to make sure we are using our particle material (the one with the legacy additive shader on it) and that our ripples are horizontal billboards. This way they will always be perfectly flat.The shader settings for our material, the shader is legacy/particles/additive and our ripple texture has been connected.
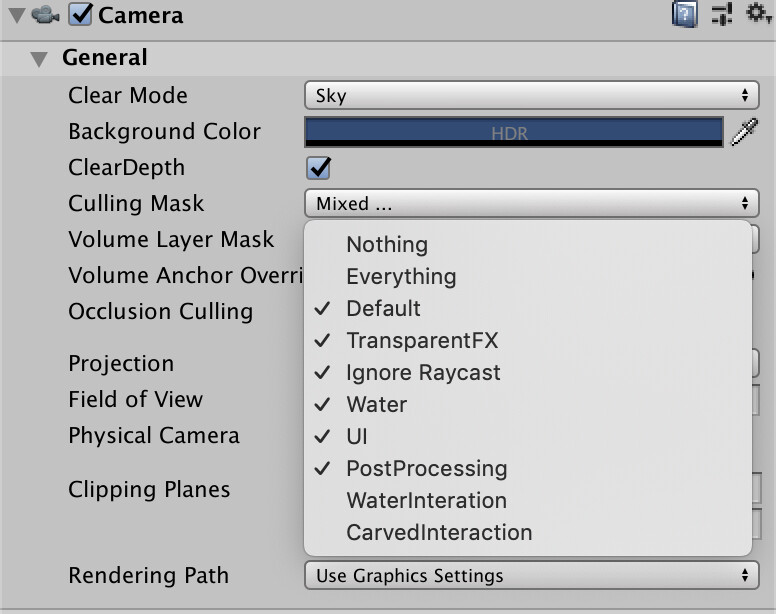
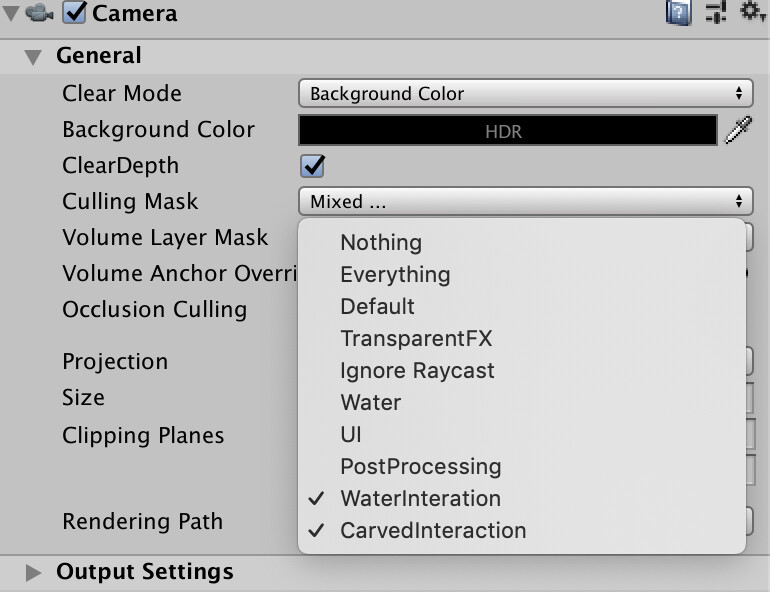
Finally we need to change our main camera to ignore our water interactions, and our orthographic camera to only see our interactions.
Our main camera can see every layer except the Interaction ones.Our Interaction camera can only see the interaction layers.
Now we are all set to mix it together!
Step 4: Adding it all together
Add our Render Texture to the output of the interaction/orthographic camera:
The Render Texture should be the target for the camera output.
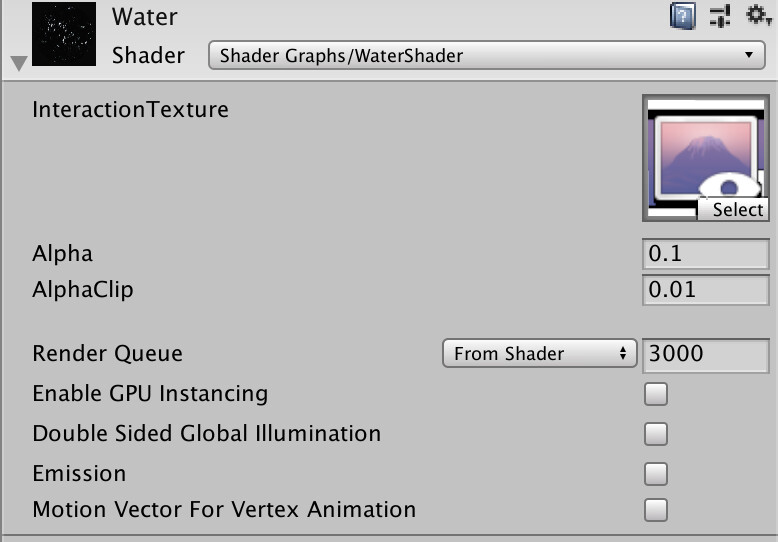
Then add our shader to our Water material, add the interaction Render Texture to the texture input.
The water material should have the WaterShader and the Interaction Render Texture.
Done!
With those setup your water should be ready! Hit play and walk around a bit to see the interaction take effect!
It’s been 12 weeks since we started this semester, 8 weeks (approximately) of development towards our Alpha for Spirits. We got a block out early on, grey blocks that marked the space that would become our deserted mall.
An early grey box of Spirits
As an environment artist this was fun to make, but it din’t satisfy the needs of our team to visualize our retro look. There was speculation that we could make this into an ancient temple.
I went all out, with Unity 2018’s new graphics and tools it took only a few hours to turn that blockout into a space that truly feels like a deserted mall.
Above you can see the result of my endevours. If it weren’t for the amazing tools I had to work with then this very well could have been a waste of valuable design time. Instead, using the HDRP Triplanr Shaders, Pro Builders modeling tools, and the amazing realtime lighting each piece of that blockout essentially manages it’s self.
Using the Substance in Unity plugin I was able to find materials directly on Substance Source, modify the .sbs in Substance Designer, and connect them directly to HDRP Lit materials. By enabling triplanar projection I skipped any UVing time and got instantly tiled, high detail textures.
On Substance Source I looked for four distinct materials to create the feel of our game, while still maintaining the readability of the environment : floor, ceiling, walls, and decorative materials.
Testing shaders and textures to block out the ‘visual feel’
We took this approach to blocking out the ‘mood’ or feel a step farther by developing simple, but distinct, shaders based on the work of Ciro Continisio. With the feel really coming together we just had to enable volumetric fog, and we had a level that not only represented our metrics, but also FELT right.
Our lattest video, showing our block out progress.
Our second blockout focused on getting the ‘mall’ feeling’ and working out our metrics.
This phase of our blockout was a coordinated effort to begin introducing the technology we need for our final product. Here I have introduced Cinemachine and Timeline to bridge cut-scenes and gameplay. We also converted our old camera system to be a cinemahcine enhanced version.
Continuing our tech push, I integrated Unities HDRP package. This will give us much more advance graphics features. These include volumetric lighting, beer decals, shader graph support and many other items.
Our most recent version is back to pushing the lighting and feel of the space. We have decided to embrace a night time setting, so I have implemented a skybox to support that mood. One thing I found in the process is that moonlight is significantly more yellow/orange than sunlight by several hundred kelvin. So far the best solution seems to be colour grading for a more familiar nighttime look.


